Fox FV721 modeling challenge (step 1:tire)
This project consists in a step by step armored reconnaissance vehicle. But with the show in summary form the production of all parts of the model as well as materials, textures and UV maps.
I do not intend to make this show the best of things, but if my way of resolving the various issues, which involves a project of this nature.
I hope it is useful to all and fill that void a bit there in the modeling of this type of object especially Spanish speakers.
Reto modelado del FV721 Fox
Este proyecto consiste en realizar paso a paso un vehículo de reconocimiento blindado. Pero con la particularidad de mostrar en forma resumida la confección de todas las piezas del modelo, así como los materiales, texturas y mapas UV.
No pretendo con ello mostrar el mejor hacer de las cosas, pero si mi forma de resolver los distintos aspectos, que conlleva un proyecto de estas características.
Espero que sea de utilidad a todos y llene un poco ese vacio que existe en el modelado de esta tipo de objeto sobre todo en habla española.
Blueprint (Karras):
http://www.blueprintsfree.com/photo-...1-Fox_jpg.html
Data concerning the vehicle: / Datos sobre el vehículo:
http://en.wikipedia.org/wiki/Fox_arm...ssance_vehicle
References: / Referencias:
http://www.milweb.net/webverts/49504/
http://commons.wikimedia.org/wiki/Fi...FV721_pic4.JPG
http://commons.wikimedia.org/wiki/Fi...FV721_pic1.JPG
http://en.wikipedia.org/wiki/File:FV...008-08-09).jpg
http://www.flickr.com/photos/petered...n/photostream/
http://www.locamotion.com/garage.html
The first step is the modeling of the tire of the vehicle.
El primer paso es el modelado del neumático del vehículo.
 |
| Is placed at the background the image that will serve as a guide for modeling / Se coloca en el fondo la imagen que nos servira de guía para el modelado |
 |
| Add a plane and scale as needed / Agregamos un plano y se escala a la medida que se necesita |
 |
| Modify the map in function of the inclination of the plugs of the tire / Modificamos el plano en función de la inclinación de los tacos del neumático |
 |
| Add the loop to continue adjusting the shape / Agregamos los loop para continuar ajustando la forma |
 |
| Three new loop to continue adjusting the shape / Tres nuevos loop para continuar ajustando la forma |
 |
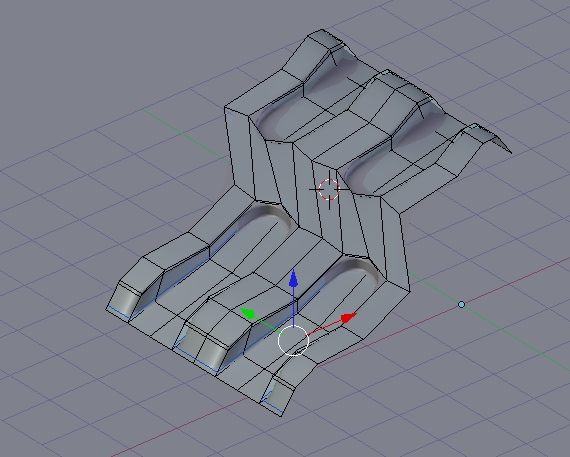
| Vertices are adjusted to form the curve takes the cue in the center / Se ajustan los vértices para formar la curva que lleva el taco en el centro |
 |
| We have ready the model we use to add to the array that will be shooting the tire / Ya tenemos listo el modelo que usamos para agregar al array que formará el rodaje del neumático |
 |
| With the merger option vertices who are joined together or overlapped / Con la opción merger unimos los vértices que esten solapados o juntos |
 |
| Select the faces to form rolling to extrude / Seleccionamos las caras que formaran la rodadura, para extruirlas |
 |
| And so we have formed the band tire tread / Y así ya tenemos formada la banda rodadura del neumático |
 |
| Select the faces that are superfluous as no part of the band, to remove / Seleccionamos las caras que estan sobrando ya que no forman parte de la banda, para eliminarlas |
 |
| The band now ready to build the tire / La banda ya lista para construir el neumático |
 |
| Add a Bezier Circle, we will use to make the circumference of the tire / Agregamos un Bezier Circle, que emplearemos para hacer la circunferencia del neumático |
 |
| We use the Bezier Circle as a route to use the "Deform curve" / Usamos el Bezier Circle como ruta para usar el "Deform curve" |
 |
| As the fit is not perfect the corners are welded with (Ctrl-M Merger -> At center) / Como el ajuste no es perfecto se sueldan los vértices con (Crtl-M Merger -> At center) |
 |
| It fits as we need to modify the shape of the tire / Se ajusta conforme lo necesitamos para modificar la forma del neumático |
 |
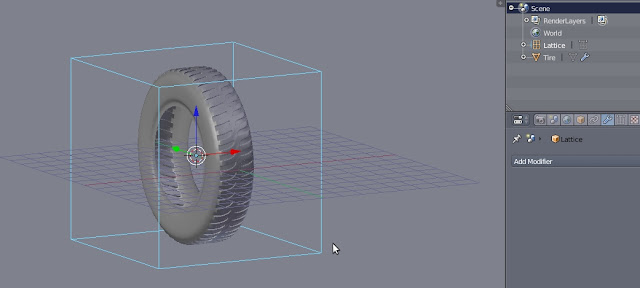
| Add the lattice modifier to the object we are modeling / Agregamos el modificador lattice al objeto que estamos modelando |
 |
| The lattice and with the modifications / El lattice ya con las modificaciones |
 |
| And the end result. Ready the model. / Y el resultado final. Ya listo el modelo. |


Estoy leyendo tu magnifico tuto y con blender abierto. Haber que tal me sale ese caucho.
ReplyDeletePues si me costo unas cuantas hora montar todas las fotos. Pero vale la pena.
DeleteSaludos